Marker Lanes Group
Use the controls in the Marker Lanes group to select the Marker set to use, to specify the number of markers, and to add new markers or delete selected markers.
When you initially define sizing for an analysis, the number of marker lanes are assigned from the left-most lane, continuing to lanes to the right.
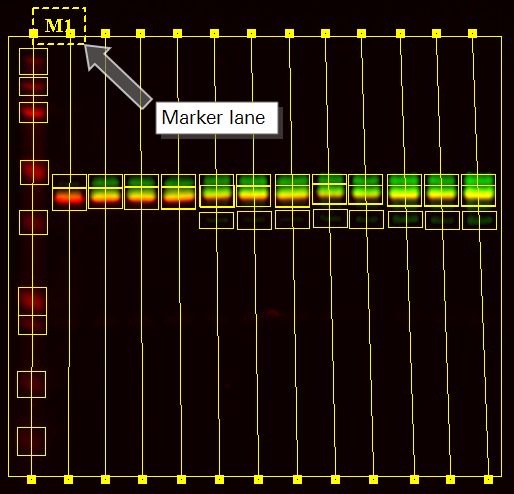
The sizes defined in the marker lane set are assigned from the bands in the marker lanes from top to bottom.
Sizing information is displayed in the Bands Table using the Size column. For bands in the Marker Lanes, the sizes are the standard's sizes; for all other bands, the sizes are calculated. See Bands Table for more information.
If you define more sizes than bands on a membrane, not all sizes in the marker are used. If you define fewer sizes than there are bands on a membrane, the bottom bands are not part of a standard.
- Click the template button to display the drop-down list of available Marker templates.
-
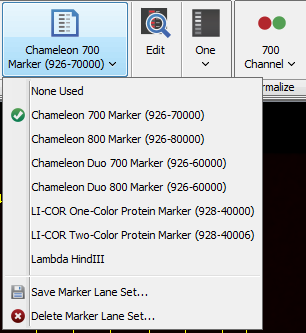
- Select the Marker template that you want.
-
Ensure the Western Analysis Application tab or MPX Western tab is visible.
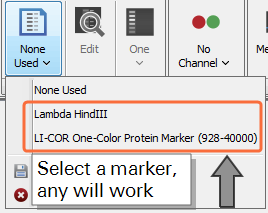
- In the Marker Lanes group, select any Molecular Weight Marker from the Select Marker Lanes Set list
 .
. -
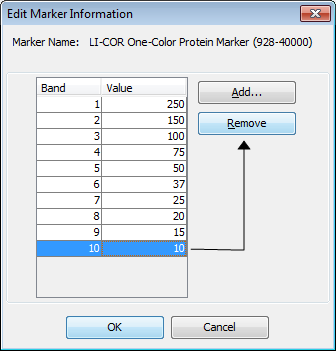
Click Edit
 . The Edit Marker Information dialog will open.
Changes made in this procedure will not overwrite the current marker, unless you save the changes with the current marker's name.
- In the Edit Marker Information dialog, click to select a weight and click Remove. Repeat this step until all appropriate weights have been removed (remove all weights if adding a new marker).
-
Click Add to enter all the appropriate weight markers.
Table of Molecular Weights for Chameleon Pre-Stained Protein LaddersChameleon Duo
(PN 928-6000)
Chameleon Kit
(PN 928-90000)
Chameleon 700
(PN 928-70000)
Chameleon 800
(PN 928-80000)
700 Channel
800 Channel
700 Channel
800 Channel
700 channel
800 channel
160
260
160
260
160
260
125
125
125
125
90
125
90
70
90
70
50
70
50
38
50
38
30
38
30
25
30
25
15
25
15
8
15
8
8
8
8
8
- After all appropriate weights have been added, click OK. The Select Marker Lanes Set list will display Custom.
- To save the newly added marker:
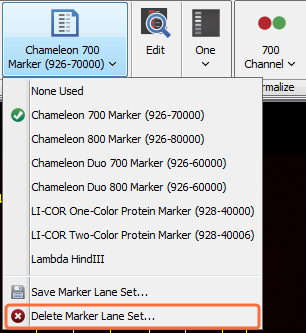
- In the Marker Lanes group, click the Select Marker Lanes Set list .
-
Click Save Current Marker Lane Set.
The Marker Set Name dialog will open.
- Enter the name of the marker and specify the channel (e.g. Chameleon Duo 700 or Chameleon Duo 800).
- Click OK.
The new marker has been added to the Work Area and saved.
Repeat this process for each channel if the Chameleon Duo or Chameleon Kit is being used.
The Chameleon Duo, Chameleon 700, Chameleon 800, and Chameleon Kit have a visible 260 kDa band. The band does not appear in the 700 nm channel for Chameleon 700, so DO NOT include this value when adding weights to the Chameleon 700 marker set.
If you are using the Chameleon 700 only (not Chameleon 800), there will be no 125 kDa band.
-
Select Delete Marker Lane Set... from the Select Marker Lanes Set list
.
The Delete Marker Lane Set dialog will open.
- Select the marker lane to delete and click Delete.
The deleted marker will still appear on other images where it was used previously. An asterisk will appear after the marker's name to designate that it is a deleted marker.